CCS Virtual Machine Instructions
This guide provides instructions for importing a pre-built virtual machine with Code Composer Studio (CCS) onto your computer.
Version history
Any updates or corrections to this guide will be listed here:
- 15 August 2016: Updated suggestions on installing VirtualBox on Linux.
- 2 July 2016: Initial version
About Virtual Machines
A virtual machine (VM) is a method of emulating another computer system. In this case, you will download a VM with a complete archive of a Linux system (running Ubuntu) with an installation of CCS, avoiding the need to install and configure CCS on your computer.
To run a VM on your system, you must install an application called a virtual machine manager (VMM). This guide provides instructions for using VirtualBox, a freely-available VMM maintained by Oracle that is quite easy to configure and run on a general purpose computer. VirtualBox has been in development for many years and is quite stable.
If you want to use another VMM (such as qemu, VMware Player, or Parallels), you are welcome to do so, but you are on your own for support. It should be possible so long as your VMM has USB support.
Important Terminology: In the context of virtual machines, the physical computer that runs the VM is called the host, while the system running inside the VM is called the guest. You will see these terms in this guide and in any documentation you read about VMs.
Before you start: System requirements
To run the VM, your computer (ie, the “host” computer) must meet the following requirements:
- A 64-bit x86 Processor
- At least 2GB of RAM
- At least 10GB free hard drive space
Your computer should easily meet requirements (1) and (2) if it was a) purchased in the last 8 years and b) is not an ARM-based tablet. Just make sure you have enough hard drive space.
Installing VirtualBox
Downloading the Installer
You can download VirtualBox from its website here. On the Downloads page, you will need to download two items:
-
The latest version of the VirtualBox platform package for your operating system. This is the application that will run the VM.
-
The Oracle VM VirtualBox Extension Pack: This is a set of extra features for VirtualBox, including support for connecting USB devices to VMs. To download it, click on the “All supported platforms” next to its heading on the page.
If you are installing VirtualBox on Linux, you can likely install a recent version of the VirtualBox platform package directly from your package manager. If you do this, will also need to install the Extension Pack separately: it may be available as a separate package in your package manager, or you may need to install it manually.
Running the Installer
Once you have downloaded the installer, run it and start the
installation using the default options.
If you are running on Windows, you will see some prompts to install
drivers during the installation: this is normal and you should tell
them to install. VirtualBox installs some special drivers to allow
you to use your network connections with VMs.
Once the installation is complete, you can open VirtualBox.
Installing the Extension Pack
Before we can use VirtualBox with our VM, we also need to install the Extension Pack that we downloaded with the installer. To do this, just double-click on the file for the Extension Pack and it should open in VirtualBox and ask for confirmation to install. If for some reason this doesn’t work, you can install the Extension Pack manually from inside VirtualBox by selecting File > Preferences > Extensions and adding the Extension Pack directly.
When its installation is complete, we are ready to use it with our CCS VM.
Downloading the VM
The Virtual Machine with CCS is packaged as a single archive called an OVA file, which is a standard format for importing and exporting VMs easily. The format is supported by a number of VMMs, including VirtualBox.
You can obtain a link to download a VM via our site on your course website (myWPI or Canvas) on the page entitled “Virtual Machine Information”. The link is not included on this page so that it is not available to the general public.
Note that the VM file is quite large (about 3.7 GB), so you may want to be on campus when you download the file.
Before you proceed with importing the VM into VirtualBox, make sure that the file you downloaded is the correct size of ~3.7GB to help ensure there were no problems when downloading.
Importing the VM
Now that we have downloaded the VM, we need to import it into VirtualBox.
First, open VirtualBox and select File > Import Appliance. This will present you with a dialog for importing OVA files. Click on the folder icon, select the OVA file you downloaded, and click Continue.
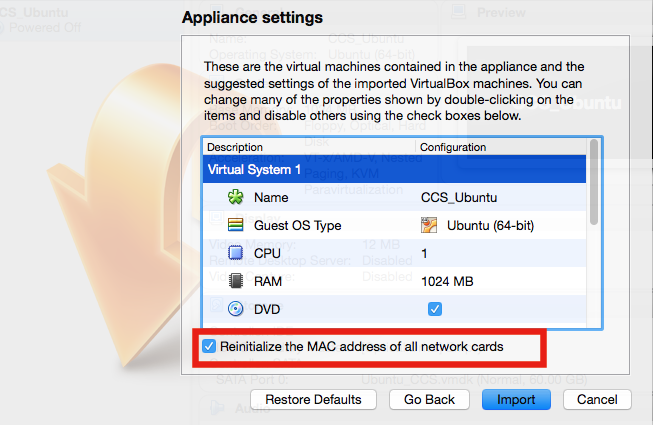
You will then be presented with a list of the VM’s configuration settings, like in the figure below. Check the box under the list labeled Reinitialize the MAC addresses of all network cards (highlighted in red in the figure), which ensures that each VM has different network hardware settings.
If you have used VMs before, you may want to adjust some of the other
VM settings for your needs; otherwise, click Continue.
VirtualBox will now import the VM, which will take a few minutes.
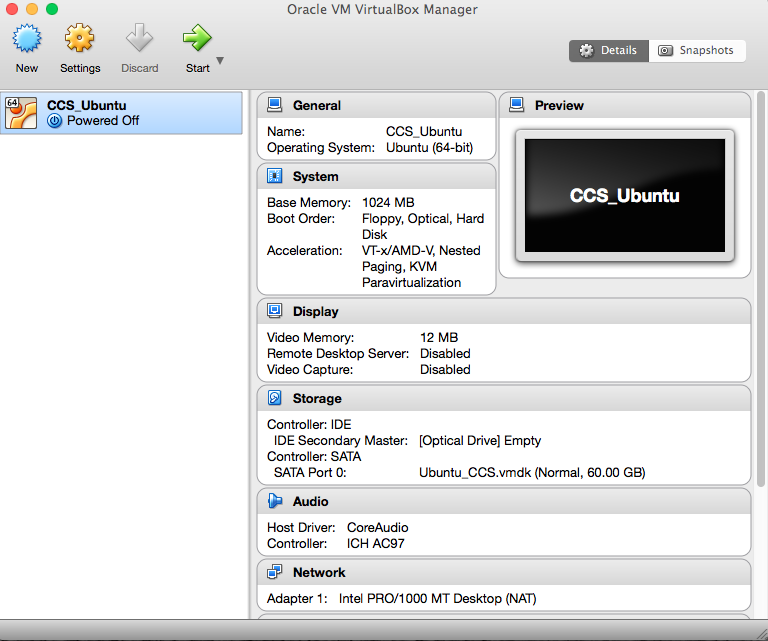
When the import process is complete, you should see the VM in the main VirtualBox window, like the figure below.
Starting the VM
We are now ready to start the VM. In VirtualBox, click on the VM in the sidebar on the left and then click Start. This will open a new Window showing the VM console, as shown in the following figure.
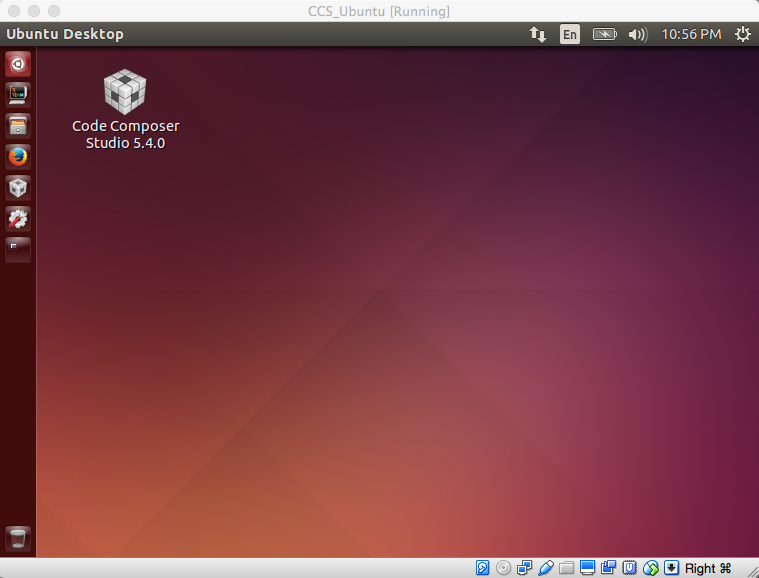
You can think of the VM console window as if it were a physical
display on the guest machine: you can see what would be displayed on
the monitor of the machine. Thus, you will see a splash screen as the
VM boots up, followed by an Ubuntu Linux desktop.
Once the VM finishes booting, you should be able to resize the VM
console window and the desktop will resize with it.
Before you start playing with the VM, note the menus in the VM console window. These menus allow you to control of the VM like you would a real system: you can press the power button, connect USB devices and CDs, take screenshots, etc. (You can even perform actions that you’d never be able to do on a real system, like pausing the entire execution state of the machine!) Take a moment to look over these controls.
Note on mouse integration
You should be able to move your mouse between the VM console window
and other windows on your system normally.
This is an extra feature in VirtualBox, and it only works because a
special driver has been installed inside the VM we have made for you.
Normally, once your mouse enters the VM console window, mouse and keyboard input are “captured” by the VM until a special key (called the host key) is pressed. This key is usually either the Control (Windows/Linux) or Command (Mac) key on the right side of your keyboard.
Pressing the host key tells VirtualBox to “release” the keyboard and mouse to the host system so that you can control things outside the VM or issue commands from the menus.
Again, you should not need to worry about this, since we have enabled some extra VirtualBox features (called VirtualBox Guest Additions) to make the integration more seamless. However, if this configuration ever breaks for some reason, you should remember the host key so you don’t get stuck!
Starting CCS
Once the VM boots, you should see an icon for CCS on the desktop. Double-click it to launch CCS, and you should be presented with the familiar workspace prompt, as shown below. You can use the default workspace path, or set your own.
To test your CCS install and demonstrate how to connect your MSP430 board to the VM, open Firefox inside the VM (you can see an icon on the sidebar), download the template (demo) project for lab 0 from your course website and import it into your CCS workspace, and build the project—see the assignment for Lab 0 for instructions for how to do this.
Connecting your lab board
Once you have imported the template, it’s time for the final step: connecting your MSP430 board to the VM and launching the debugger.
First, make sure Code Composer is NOT running on your host computer–it should only be running inside the VM. Then, plug your MSP430 board into your computer and read the following:
Background on USB Devices in VirtualBox
VirtualBox allows you to attach USB devices to a VM, as if they were physically plugged into a guest system. It does this using a special driver to take control of a USB device before the host operating system can use them.
To illustrate this, think about a flash drive. Can you plug it into two computers at the same time? Of course not! To handle this, VirtualBox needs to grab control of a USB device at a very low level, before it can be used by applications on the host operating system.
Why did I just explain all of this? To make this process work, VirtualBox keeps a list of which devices it needs to connect to VMs, and which it can allow the host operating system to use. To attach your MSP430 board to the VM, it needs to be in this device list.
The VM we have provided should already have the list configured such that your lab boards will be attached automatically. However, you will need to confirm this to be sure.
Attaching your board to the VM
In the menu bar of the VM console window, open the Devices menu and hover over the entry USB Devices. You should see a list of USB devices that resemble things attached to your computer, like the following:
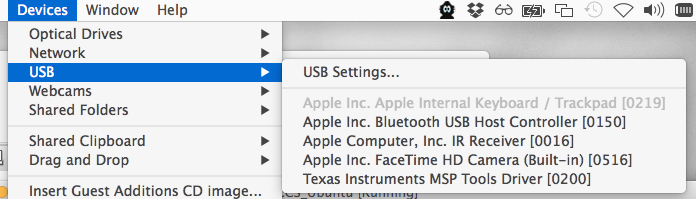
If your board is connected to your computer, you should see an entry “Texas Instruments MSP Tools Driver”. This is your board! Entries that have check marks are attached to the VM. There are now three possibilities on how to proceed:
-
If there is a check mark next to the entry, your board is already attached to the VM! Yay! Proceed to Starting the debugger to continue.
-
If there is no check mark next to the entry, click on it and then open the menu again. If it is now checked, your device is now attached and you can proceed to Starting the debugger). If you get an error saying the device is already in use, see the next option.
-
If the entry is greyed out, something on your computer is already using the device. Make sure CCS is NOT running on your host machine (it’s okay if it’s running in the VM), unplug and reconnect your board, look in the menu again and try to click on the entry if it’s not checked. If you get an error or the entry is still greyed out, see Manually adding a USB device entry.
Manually adding a USB device entry
In the menu bar of the VM console window, go to Devices > USB Devices > USB Settings. You will be presented with a window like the following, which contains a list of devices that VirtualBox should attach to the VM automatically.
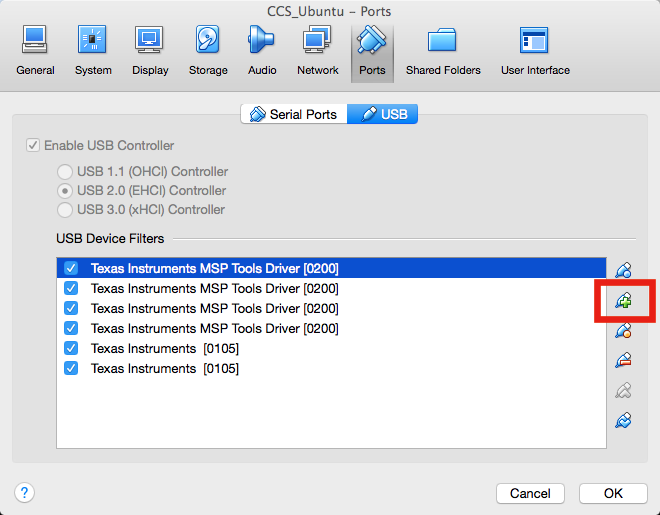
To add an entry for your board, click on the icon showing a USB device with a “+” and select the entry for your board (“Texas Instruments MSP Tools Driver”). This will add entry to the list1.
When you are done, click OK to return to the VM console. Reconnect your board one last time, and it should appear in the USB devices menu with a check mark. If it does not, stop here and ask the course staff for help.
Starting the debugger
Once your board is attached to the VM, start the debugger by clicking
on the “Debug” icon (![]() ) in CCS.
) in CCS.
Ideally, CCS will connect to your board, load the code onto the MSP430, and attach the debugger. You should then be able to use the debugger normally! If this happens, you are done! Take a moment to celebrate your success!
However, it is more likely that you will be presented with one of the following errors:
- USB FET not found
-
This means that CCS cannot detect your board. Try the following:
- Make sure your lab board is connected to a USB port on your computer and that the power LED is on
- Make sure that your board is attached to the VM, meaning that it is in the USB devices menu (Devices > USB Devices) and has a check mark next to it. See Attaching your board to the VM for details
- After you’ve tried the above, you can try restarting your VM (click the X on the VM window, power it off, and restart it). Only try this as a last resort.
- Could not set device Vcc
-
It is not always clear why this error occurs, but it seems to happen when a device is first attached to a VM. Try the following:
- Wait one minute and hit Retry. This seems to help.
- Try all of the options for the above error “USB FET not found”.
- Firmware update required
-
This means that the version of CCS that last programmed your board does not match the version in the VM. You may click Update, but do so at your own risk! If the update fails, your board may become temporarily unusable and you may need to connect your board to a lab computer (or other machine physically running CCS) to fix it. If you don’t want to try this yourself (which is fine), bring your computer and your board to office hours and ask the course staff for help.
Hopefully, the troubleshooting steps above have allowed you to start the debugger and you can now use CCS! When you are done with the debugger, make sure you end the debug session safely using the Stop button (also known as Terminate) to avoid any additional issues.
If you are still having problems connecting your board, feel free to ask the course staff for help. This can be a tricky process, and we are happy to provide support!
Working in the VM
You can use the VM almost as if it were just another window on your computer–you will get a feel for doing so after working with it for a while.
In addition, there are two important items to know about using the VM.
Saving your work
Normally, your work is saved inside the VM’s hard drive, which is just a file on your host computer. This is generally not a good idea for long term use—if the VM ever breaks, you should be able to just delete it and import a new one without worrying about your files.
There are a few solutions to this:
- Use a flash drive
-
The easiest solution is to connect a flash drive and attach it to your computer using the USB devices list. To do this, you can follow the instructions for attaching your lab board to the VM, except use the name of your flash drive instead of your lab board. Note that you may need to “eject” your flash drive from your host OS before VirtualBox can attach it.
- VirtualBox shared folders
-
VirtualBox contains functionality for connecting folders on your host computer to a folder on guest VM. This is an advanced topic, but if you want to try it, you can find tutorials online for how to configure this.
- Mount your WPI network drive on the VM (on-campus only)
-
If you live on campus, you can just mount your WPI network drive to the virtual machine just like on your host system. See here for instructions on how to do this.
- Use version control
-
If you have access to a git repository (a private one 2), or other version control repository that you can use, just commit your code from the VM. If you are interested in doing this, you can find plenty of instructions for using git (or another version control system) on Linux.
If you want a simple solution, we recommend investigating the flash drive option–if you want help with this, come to office hours and we will be happy to help you learn how this works.
Stopping the VM
When you are done using the VM, you can close it by clicking the X button in the VM console window, or by selecting “Shut down” from the Ubuntu power menu (top right corner of the top menu).
If you click the X button in the VM console window, you have two options: saving the VM in its current state to resume later, or powering it off (just like pressing the power button).
Want to learn more about VirtualBox?
This guide is not designed to be a comprehensive tutorial of how to use VirtualBox. If you want to learn more about how it works, you can find many guides and tutorials online—Google is your friend.
VirtualBox has been around for a long time and has a great online community, so it’s pretty easy to find resources.
Frequently Asked Questions
No data yet! If you have questions, please ask them!
Footnotes
-
You may notice that there are multiple entries in the list with the same name—some devices (like different lab boards), may have the same USB device name, but different identifiers like serial numbers. VirtualBox allows you to add separate entries to handle these devices differently. ↩
-
Please don’t use a public version control repository for your code, as other students may find it! If you want to use a site like Github to manage your code, Github Education provides private git repositories for students: see here for details! ↩